
URScript#
In this course we will send the programs from our own GUI program. These programs must be written first.
There are two ways to program a Universal Robots (UR) robot arm:
Using the PolyScope GUI on the pendant.
URScript
- PolyScope
the standard software that comes with UR robots
PolyScope provides a more visual programming experience and the PolyScope on the robot pendants (compared to the general PolyScope simulator you installed) has already the end effector or other sensors integrated. In this unit we will focus on the general aspects of URScript and thus 2. You can also design your robot control software in Poly
- robot end effector
the device at the end of a robotic arm, designed to interact with the environment.
On PolyScope, robot end effector is written as tool.
- URScript
The programming language for controlling robots manufactured by the company Universal Robot
Example:
def f():
  p1 = p[0, -.4, .2, 0, d2r(180), 0]
  p2 = p[1, -.4, .2, 0, d2r(180), 0]
  times = 0
  while (times < 4):
    movej(get_inverse_kin(p1))
    movej(get_inverse_kin(p2))
    times = times + 1
  end
end
The syntax looks similar to Python, but is different. It uses end keywords for example.
Structure#
The program must be written inside a function:
def function()
  statement1
  statement2
end
The statements must be indented by at least one space.
Fundamental syntax#
Use these resources to see examples:
Motion function movej#
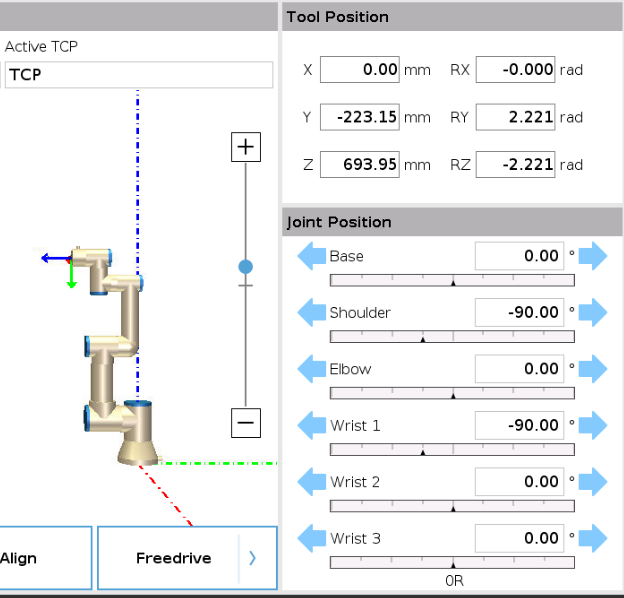
Fig. 26 Robot tool pose (titled tool position) and joint rotations (titled joint position) on PolyScope#
One of the motion commands that you will probably work often is movej. movej gets a list of six numbers as a parameter:
movej([0, d2r(-90), 0, d2r(-90), 0, 0])
[0, d2r(-90), 0, d2r(-90), 0, 0] is a list which is fed to the movej command. Each element in the list describes one joint position as shown in Fig. 26.
d2r() converts degrees to radian. movej works with radians and 0° corresponds to 0 radian. Degrees are more intuitive, therefore I used the d2r() instead of writing the angles in radian.
0°: base
-90°: shoulder
0°: elbow
-90°: wrist 1
0°: wrist 2
0°: wrist 3
You will still see angles in PolyScope in radian (for example tool position in Fig. 26), so you should understand what radian is to make sense of the numbers:
- radian
a unit of angular measure (rad). Whole rotation is \(2\pi\) rad and a right angle (90°) is \(\pi/2\) rad
Exercise 41 (Waving robot arm)
Write a program that moves the robot arm back and forth like a waving hand. The robot must wave three times.
Use the following template.
def f():
  # Move to default position
  movej([0, d2r(-90), 0, d2r(-90), 0, 0])

  waving_count = 0

  #while (waving_count):
  #end
end
Tip
Click the ⬅️ ➡️ arrows in the joint positions (see Fig. 26) to get an idea how the robot reacts to different angles, and then use these values in the movej command.
Coordinate frames#
The position that we provide, e.g., x = 1, y = -3, ... will be coordinates of a specific coordinate frame. So we should understand what a coordinate frame is.

Fig. 27 Right hand rule for a coordinate frame showing the relations between different axes.
CC BY-SA 4.0. By File:Right hand rule Cartesian axes.svg: User:Acdx, cmglee
derivative work: MikeRun. Source: Wikimedia Commons#
- coordinate frame
defines the origin and x, y, z directions.
Coordinate frames are typically drawn using 🟥, 🟩, and 🟦 colors, which correspond to the x, y, z axes, respectively. Like we write RGB (red green blue; and not BRG for example) are x, y, z axes in the same order.
Our robot has two predefined frames:
BaseTool
We will typically specify coordinates in Base coordinates. This coordinate frame is spanned by the 🟥, 🟩, and 🟦 dashed and dotted lines which intersect inside the base of the robot as shown in Fig. 26.
The Tool coordinate frame can be seen at the end of the head of the robot, where the tool is typically attached as shown in Fig. 26. We see that the base coordinate frame is fixed (when Base is selected), but the pose of the tool coordinate frame changes with different joint positions.
The six joint positions lead to different poses of the tool coordinate frame and thus to different poses of the tool.
Exercise 42 (Finding a position in a coordinate frame)
Assume that the robot’s base is mounted on a workbench visualized by the Feature Plane_1 that we added in section Adding a plane to visualize a workbench. Give an example [X, Y, Z] coordinate for the tool position, in which the tool touches the ground.
Pose#
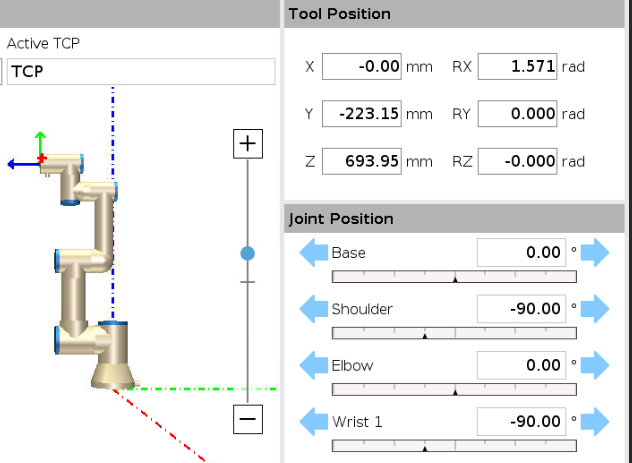
Fig. 28 An example pose shown in Tool position. We see that the tool coordinate frame is rotated 90° around the x-axis.#
Not only the position, but which something is facing is also important. For example even your head has typically a fixed position relative to the chair you are sitting on, it still does matter in which direction you are looking or speaking. You can rotate your head. We introduce pose which integrates both position and rotation.
For example the tool pose in Fig. 28 corresponds to the following pose:
p1 = p[0, -.22315, .69395, 1.571, 0, 0]
Note the p in front of the bracket. This is a special list, which is reserved for a pose.

Fig. 29 The fingers show the positive direction around an axis.
CC BY-SA 4.0. By SVGguru. Source: Wikimedia Commons#
The first three elements make up the position. These are given in meters, so we get:
0 cm in x direction
~22 cm in y direction
69 cm in z direction
The remaining three the rotation in radian.
90° rotation around the x axis, because
d2r(90) ~= 1.571.0° rotation around the y axis
0° rotation around the z axis
The direction is defined by the right hand rule in Fig. 29.
Exercise 43 (Finding a feasible pose for the robot)
Robot picks up a white plastic block and places it again.
You want to pick up items from the workbench similar to shown in the video. To do this, you have to move the tool to the right pose.
Which of the following are feasible poses for the tool?
p[0, -.4, .2, d2r(90), 0, 0]p[0, -.4, .2, 0, d2r(90), 0]p[0, -.4, .2, 0, 0, 0]p[0, -.4, .2, 0, d2r(180), 0]p[0, -.4, .2, d2r(180), 0, 0]
You can assume some length for the gripper and the items.
You can think on the paper, or use the simulator.
Hint
Think about which direction the gripper must face (also called pose) to be able to pick the items as in the video. Then think about in which axes the gripper coordinate system must rotate to reach this pose.
If you are curious how these angles work, refer to Euler angles.
movej#
Parameters are rotations for each of the six joints:
movej([base, shoulder, elbow, wrist1, wrist2, wrist3])
But it is not intuitive to control a robot using joint rotations. As a user we want to say “Move to the object” or “Move to this pose”. So we need to use a function that converts a seen object to robot joint positions for picking it up, or a pose to robot joint positions. We will use the latter one.
Transforming a pose to robot axis rotations#
The move commands require robot joint positions which are all rotations. To move the robot to a pose, use get_inverse_kin(), which stands for get inverse kinematics.
def f():
  p1 = p[0, -.4, .2, 0, d2r(180), 0]
  p2 = p[1, -.4, .2, 0, d2r(180), 0]
  times = 0
  while (times < 4):
    movej(get_inverse_kin(p1))
    movej(get_inverse_kin(p2))
    times = times + 1
  end
end
Exercise 44 (Moving between points on a coordinate system)
Write a program that moves the end effector to the following points in order, i.e., a, b, c, d. Your starting point is the origin of the coordinate system below. The distance between 0-1, 1-2 etc, is 10 cm.
Begin with the robot program template above by replacing the robot program (not the C# program) in this C# template.
y
4
3  d  b
2
1 a     c
0 1 2 3 4 x
The origin x=0, y=0 of the coordinate system is at p[0, -.4, .2, 0, d2r(180), 0]. So a has the pose p[0 + 0.01, -.4 + 0.01, .2, ...].
If you are aiming for a more readable solution, then introduce constants and a function like:
  X_ORIGIN = 0
  Y_ORIGIN = -.4

  # Moves to the coordinates x and y relative to X_ORIGIN and Y_ORIGIN
  def move(x, y):
    movej(...)
  end
A warning on transferring decimal numbers from C# into URScript#
Warning
The robot programming language (URScript) uses . (dot) as decimal delimiter. You may want to convert a double or decimal to a string in your solution, e.g., string.Format(Template, itemId). If your OS is configured to a locale which uses , (comma) as a decimal like Danish, then the robot won’t understand the numbers and not move. Use the code below to set your locale to the InvariantCulture, which uses . as a delimiter.
using System.Globalization;

var n = 3.14;
var template = "string.Format + invariant culture: {0}";
string.Format(CultureInfo.InvariantCulture, template, n);
You can visualize the difference with the following code:
using System.Globalization;

var n = 3.14;
// Print using your default locale
Console.WriteLine($"In your default locale: {n}");

// en-DE
Thread.CurrentThread.CurrentCulture = new CultureInfo("en-DE");
// Sets the locale to en-DE. In Germany, decimal delimiter is a comma.
Console.WriteLine($"en-DE: {n}");

// en-US
Thread.CurrentThread.CurrentCulture = new CultureInfo("en-US");
Console.WriteLine($"en-US: {n}");

// Culture invariant formatting - best for exchanging data
Thread.CurrentThread.CurrentCulture = CultureInfo.InvariantCulture;
Console.WriteLine($"Invariant culture: {n}");

// Culture invariant formatting with template using string.Format:
var template = "Template string + Invariant: {0}";
Console.WriteLine(string.Format(CultureInfo.InvariantCulture, template, n));
Output:
In your default locale: 3.14
en-DE: 3,14
en-US: 3.14
Invariant culture: 3.14
string.Format + invariant culture: 3.14
Pay attention to , in output above.