Organizing code in a repo#
Now we will learn how to organize our code on a repository primarily for keeping a diary about our work and sharing it. First we will store them in a local repository and afterwards in a remote one.
- repository
(in context of version control systems) a data structure that stores metadata for a set of files or directory structure. The main purpose of a repository is to store a set of files, as well as the history of changes made to those files.
- version control
the software engineering practice of controlling, organizing, and tracking different versions in history of computer files; primarily source code text files, but generally any type of file.
Why do we use repositories?#
Most programmers use repositories to organize their software projects, but should you – as a student in this course?
Keeping a history of changes is helpful if we or someone else who also work in the project would like to understand changes in the project which is useful for collaboration. Keeping a history helps also to roll changes back if something does not work as intended.
Keeping projects in a repository is also helpful to collaborate and share code. You will use it later to share or submit your projects. You maybe already downloaded something from the code forges GitHub, GitLab, or Codeberg. GitHub is the most popular one and on which most of the open source projects in the world are organized. GitLab is popular among companies, because GitLab is open-source. Codeberg is European and is privacy-focused.
Last but not least, pushing your code to a forge will keep a backup of your project in the cloud.
(creating-the-first-commit=)
Creating the first commit#
When you created your project, you automatically created a repository in your project folder, unless you deactivated the field for Git repository creation.
If Rider errors out about git being not installed, then run the following command in your terminal:
xcode-select --install
In the beginning a repository is empty. Our initial project files will be the first changeset – a set of file changes. With this changeset, we will create our first commit.
On the left-most side of Rider, there is a tool bar. In the bottom of the toolbar, click the
 symbol. The Git Log tab will show up and you will see
 No changes committed.In the middle of the opened window in the bottom, Click
Commit local changes. On the upper left part of the IDE you will see aCommitwindow with four files activated and marked green. This is the changeset that we will commit to the local repository on our hard drive.You will see also
unversioned files, because the IDE has automatically chosen the files that are somewhat crucial for sharing the project with others. For example*.DotSettings.userfile was not included, because it contains personal settings which are irrelevant for others.Each commit is typically documented with a commit message.
In the
Commit Messagebelow, writeinitial, because these will be our initial files.
Sharing our repository on GitHub#
The repository we used is until now local to our computer. Now we will create a copy of the local repository on GitHub.
Click to
Commit. You should see at least two windows popping up:Share Project On GitHub, we will use this window later.In the bottom right, a notification window stating
… files committed … Share Project on GitHub On GitLab
Click
Share Project on GitHub.A new window should pop up
Log In to GitHub. ClickLog In via GitHubto login on GitHub. You will be forwarded to JetBrains website first, which forwards you to GitHub.If you don’t have an account, create an account during this step.
After logging in and authorizing Rider to access your GitHub account, go back to Rider to the
Share Project on GitHub.Deactivate
Privateflag, so others see your repository, when you submit your work.Rest of the info can stay with their default values.
Click
Share. You should see a notification window statingSuccessfully shared project on GitHub.
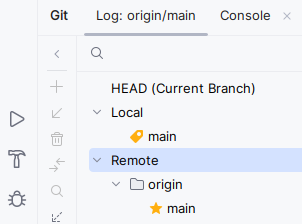
Fig. 2 Git window showing the local and remote repository information after setting up the remote repository.#
Now you should see that a remote repository configuration is added to your configuration as shown in Figure 2.
Checking the forge after push#
To see if everything went correctly, you can browse github and search for your project there. If you cannot find it, you can also use the following URL template:
https://github.com/YOUR_USERNAME/YOUR_PROJECT
Adding a README on GitHub#
When we share work, we should also write some information about what the code is about in the README file.
We could do these steps in our IDE, but we will try the web interface to demonstrate the synchronization between the forge and local repository.
Go to github and to your project repository.
On the repository page on GitHub, click
Add a README.You can write something along the lines of:
# Hello

An example program for my C# programming course.
Click
Previewto see how this text will be rendered.Commit changes....Commit changeswindow will pop up.You can leave the automatic commit message.
Commit changes. You will be forwarded to your main repository page.
Checking the forge after push#
To see if everything went correctly, you can browse github and search for your project there. Your project should be on https://github.com/YOUR_USERNAME/YOUR_PROJECT.
You should see something similar to:
YOUR_USERNAME  initial   ... 1 Commit

.gitignore
CurrencyConverter.csproj
CurrencyConverter.sln
Program.cs
Purpose of automatically tracked files#
.gitignorelists the files which should be ignored by git. These are typically intermediate files generated when we build our project. If you peek inside the folder, you will probably see:bin/ ...
binstands for binary and contains the compiled program (*.exe) and other related files. The compiled program can be generated usingProgram.csand should not be added to the repository..gitignorefiles is provided by Rider and usually added with your initial commit.*.csprojand*.slnare project and solution files. VS takes care of them when we save our project.Program.csis our source code
When should we create additional commits?#
After you have a meaningful progress on your project, then you should create a commit. Let us take this website as an example. These course materials are also organized in a repository. When I begin working, a have typically a goal, e.g., I want to write a new section about Organizing code in a repo in the file organizing-code-in-a-repo.md. In the process of writing this section, then I may also have to modify other already existing files like first-project.md and ide-installation.md. When I am finished, my changeset will consist of the modifications in first-project.md and ide-installation.md, and the new file organizing-code-in-a-repo.md. Then I would stage these three changes and write a commit message like:
new section: Organizing code in a repo
Finally I would commit and push my changes.
Adding additional commits in the IDE#
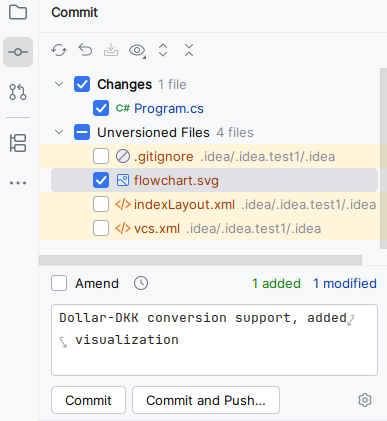
Fig. 3 Two staged files after our initial commit.#
Now we will create commits in our editor ourselves. Let us assume you have an initial commit that contains your initial C# project. You improved your currency converter code Program.cs so that it supports also Dollar to DKK and added the flowchart image flowchart.svg.
Click
 on the left sidebar. A `Commit window will show up on the left.
Select the files
Program.csandflowchart.svgand write a meaningful message, e.g.,Dollar-DKK conversion support, added visualizationas shown in Figure 3.Click
Commit and Push. A window with titlePush Commits to ...will pop up.Click
Push. You will see a notification about your push.
Push means sending a copy of our local changes to the forge.
Which files belong to the repository?#
Only add source files and project files which are relevant to compile and run your code to the repository. Files generated from source files usually do not belong to the repository, e.g., *.exe, log files etc. Some reasons are:
A repository is typically used to track changes in text files, because text files consists of readable lines which can be easily differentiated between commits.
We want to keep our repository minimal to avoid complexity. If some files can be easily generated using the source files, we have less amount of files by avoiding generated files.
.gitignore for hiding files that do not belong to the repo#
We saw three unversioned files in Figure 3. These are not important for running our project and you can ignore them by following the steps using the .gitignore file:
Click the
 icon on the sidebar.
Open
.gitignorein the root our project.Append the
.ideafolder as follows:... /_ReSharper.Caches/ .idea
.gitignorecontains the names of files or folders which should be ignored by git.Save the file.
Go to
. You should see that the three irrelevant files from Figure 3 are gone and will never be shown to you, even they exist.Stage
.gitignoreand commit (and push) your changes.
Appendix#
Creating and adding a new GitHub repository manually#
Create an account on github and login.
On your dashboard, click the green
Newbutton.Create a new repositorywindow should come up.Enter
currency-converteras repository name.Click
Create repository. You will be forwarded to the page of your repository.There are two ways to connect to the remote repository on GitHub: HTTPS and SSH. Even SSH is the most common method, it requires setting up SSH keys, which may be difficult for you as a beginner. For the sake of simplicity, we will use HTTPS.
Click
HTTPSto get the HTTPS address. Copy this address. You can use this address to define a remote manually in the IDE.
Setting up a forge in Rider manually#
After your changes, click
Commit and Push. A window titledDefine Remotewill probably pop up. (did not test this)Create a repository on the forge. On the
Define Remotewindow and paste the repository address to theURLfield.Click
OK. You will be back on thePush Commitswindow.Click
Push. A windowLogin In to GitHubwill pop up.Click
Login In via GitHub.... A web browser window will pop up and forward you to a page on https://account.jetbrains.com.Click
Authorize in GitHub. You will be forwarded to GitHub to authorize the IDE.Click
Authorize JetBrains. After confirmation you will get a messagePushed main to new branch origin/mainon the IDE.